How to Get Paid Immediately with Zoho
If you’re building a business, there’s one thing you need to do before marketing, branding, or even setting up your website: figure out how to get paid.
And I mean fast.
Because nothing kills momentum like doing all the work of building your business… and then realizing you have no easy way to collect payments. That ends here.
In this guide, I’ll walk you through how to set up Zoho Checkout, Zoho Invoice, and basic invoicing in Zoho Books—all from your Zoho One dashboard. I’ll also show you how you can also use Zoho Bookings to get paid for meetings and consulting sessions.
You’ll create a real offer, a simple way to accept payment, and an automated system that tracks your income like a pro.
Let’s make you money—today.
Imagine a world where all your business tools play nicely together (cue angelic choir). Whether it’s handling your finances, projects, or marketing, Zoho One keeps everything seamless and oh-so-simple. Plus, the price? A fraction of what you’d pay for piecing together different apps. Talk about a BARGAIN!
If you’re ready to take the leap from surviving to thriving, Zoho One is your trusty steed. Let’s ride into the sunset of efficiency, my friends. Click that button and get ready to supercharge your hustle!
Why You Need to Get Paid Before You Start Marketing
Most small businesses spend weeks creating content, running ads, and posting on social… without a single way for someone to buy. That’s backwards.
Marketing is expensive—in time, energy, and money. Before you invest in it, you need to validate your offer and open the door for revenue. With Zoho, you can do this in minutes..
Setting up your payment tools first means:
- You test and validate offers quickly
- You have real cash flow to reinvest in growth
- You act like a business from day one
Step 1: Create Your First Offer
You don’t need a full product catalog or fancy launch. You just need a simple offer people can say yes to.
Here’s how to do it:
- Pick something you already know how to do (service, product, session)
- Define the result your customer gets
- Put a price on it (flat fee is easiest)
- Give it a name they can remember
Example: “Power Hour Strategy Call – $97”
It’s specific, clear, and you can sell it right now.
More information on how to create offers:
- These 3 Methods Will Help You Create a Product Offer – Guaranteed
- How to Create an Irresistible Offer
Need help creating an offer? Grab a Fix it Session Today
Step 2: Accept Payments with Zoho Payments
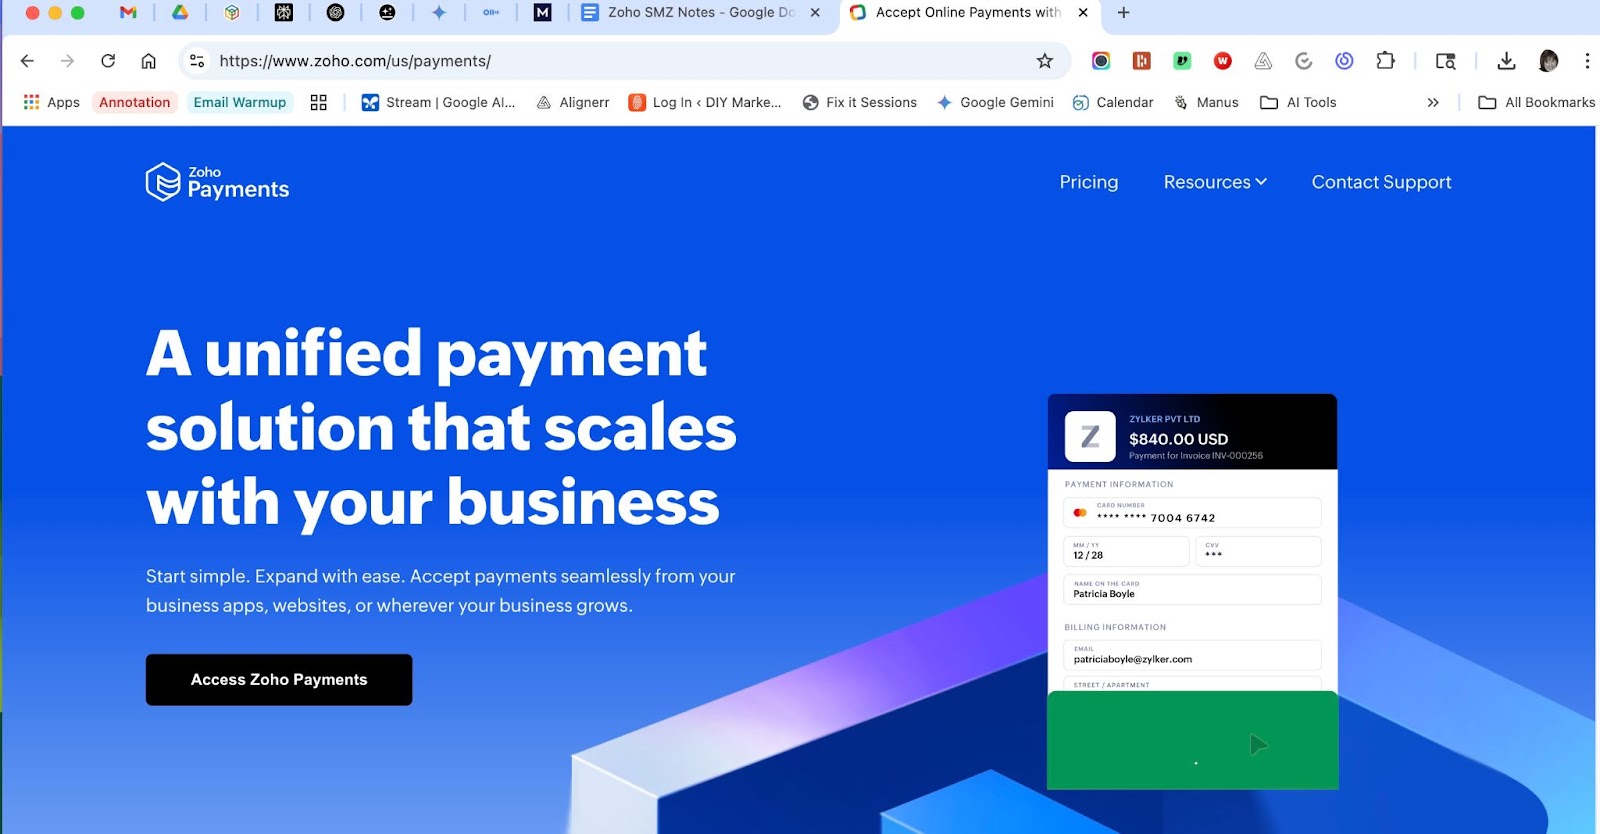
Once you’ve got your offer ready, the next step is to make sure your business can accept money—securely and easily. Zoho Payments is the built-in solution that connects across the entire Zoho ecosystem.
Zoho Payments is a great built-in alternative to platforms like PayPal. It supports a range of payment options, including credit cards and ACH, and integrates directly with other Zoho apps.
Why use Zoho Payments?
Using Zoho Payments means you’re skipping the need for extra tools and third-party services. You don’t need to sign up for PayPal, Stripe, or anything else to start getting paid. Everything’s already connected and ready to roll.
- No third-party payment processor required – Everything is managed within Zoho, reducing friction and fees.
- Direct integration across your tools – It syncs instantly with Zoho Checkout, Zoho Invoice, Zoho Books, and even Zoho Bookings.
- Global-ready from day one – Accept payments in multiple currencies using cards, ACH, UPI, and more—perfect if you work with international clients.
It’s a simple, secure, and seamless way to manage money without juggling a million accounts.
How to Set Up Zoho Payments
- Go to the Zoho Payments setup in your Zoho One dashboard.
- Choose your business location and currency.
- Connect your bank account for direct deposit.
- Set up supported payment methods (ACH, card, UPI, etc.).
- Verify your business details and submit documents (if requested).
- Once verified, Zoho Payments will be your default method in Checkout, Invoice, and Bookings.
Zoho Finance Apps: Which One Is Right for You?
Let’s pause for a second. You’ve got your offer, your payment setup, and you’re ready to start bringing in money. But before we dive into invoicing and tracking every dollar, here’s a quick overview of Zoho’s finance tools—so you know what’s what.
Great news!
You get access to all of these with Zoho One. That means you don’t have to stress over picking the “perfect” one. They’re built to work together, and whichever you start with, you’re covered.
Here’s a quick rundown:
Zoho Invoice
Think of this as your lightweight, super-smart billing sidekick. Perfect for freelancers, service providers, and solopreneurs. If you need to send professional invoices, track time, or set up recurring billing, this one’s for you.
Zoho Books
Ready for more advanced bookkeeping? This is the upgrade. It’s ideal for small business owners who want a bird’s-eye view of income, expenses, and taxes—all without hiring a bookkeeper.
Zoho Billing
Running a subscription model? This app helps you manage plans, track metered usage, and automate the back-and-forth of recurring charges. Great for SaaS businesses or agencies with packaged monthly services.
And remember: you don’t have to choose just one. Since they’re all part of Zoho One, you can mix and match, try them out, and find the flow that fits your biz. It’s like a buffet of financial automation—with zero pressure and no extra cost.
Comparison Table
Feature
Zoho Invoice
Zoho Books
Zoho Billing
Send One-Time Invoices
✅
✅
✅
Recurring Billing
✅
✅
✅
Time Tracking
✅
✅
❌
Full Bookkeeping
❌
✅
❌
Subscription Plans
❌
❌
✅
Included in Zoho One
✅
Lite Only
❌
What We Recommend
For this series, we’re using Zoho Invoice to automate your client billing and Zoho Books to track all your payments. If you run a subscription model, explore Zoho Billing separately for its advanced features.
Step 3: Set Up Zoho Checkout
Zoho Checkout is the fastest way to collect payments online. It’s perfect for one-time offers, flat-fee services, or digital products.
Step-by-Step: Set Up Zoho Checkout
- Log into your Zoho One dashboard and open Zoho Checkout.
- Click “New Payment Page” and choose One-time Payment.
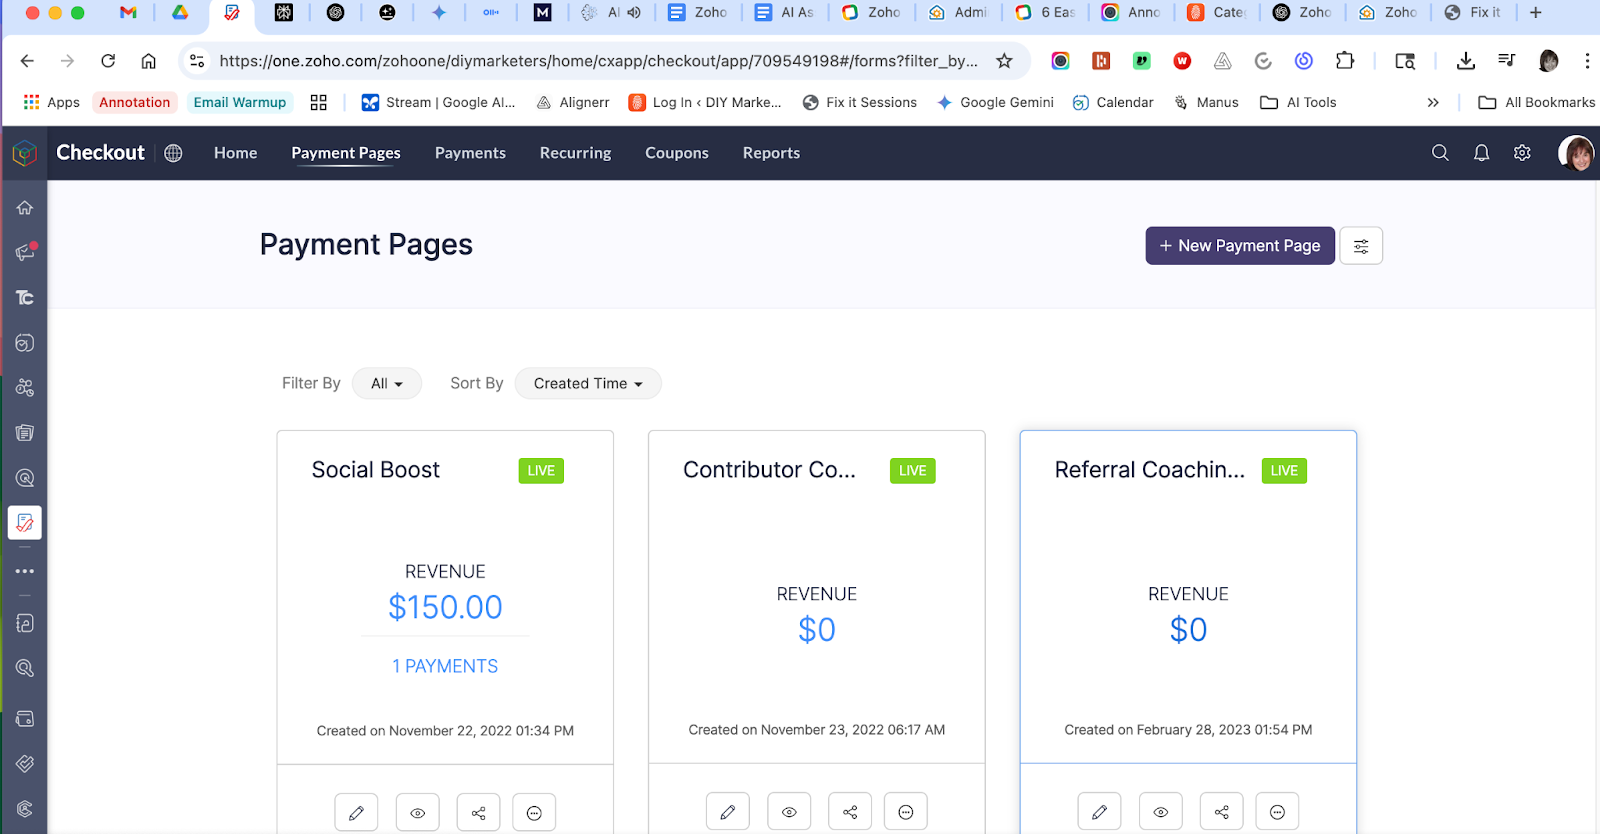
- Name your product/service (e.g. Strategy Call).
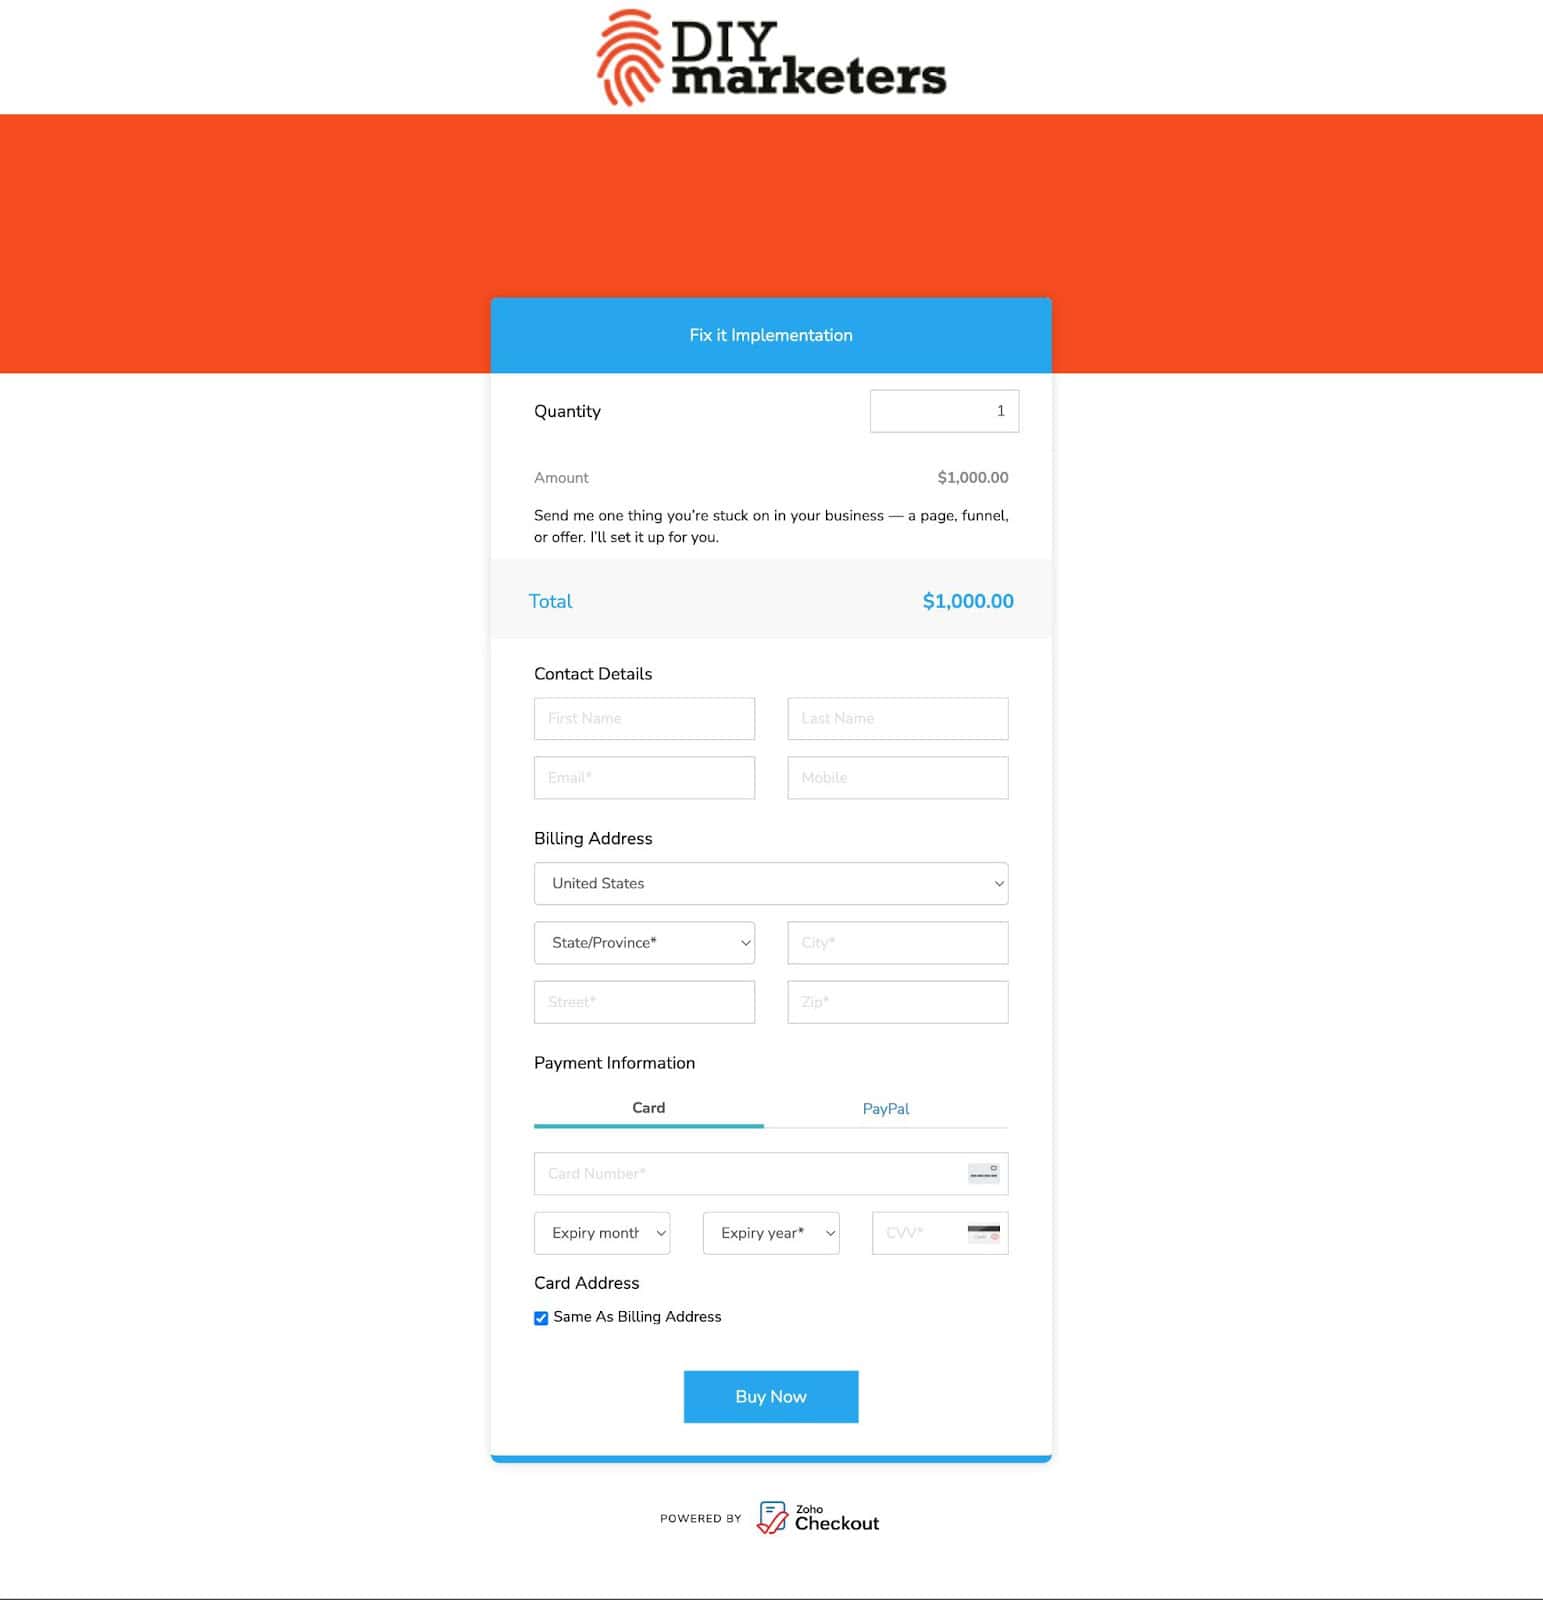
- Add a description and set your price.
- Choose your payment method (Stripe or Razorpay integration).
- Customize your checkout page (add logo, brand colors).
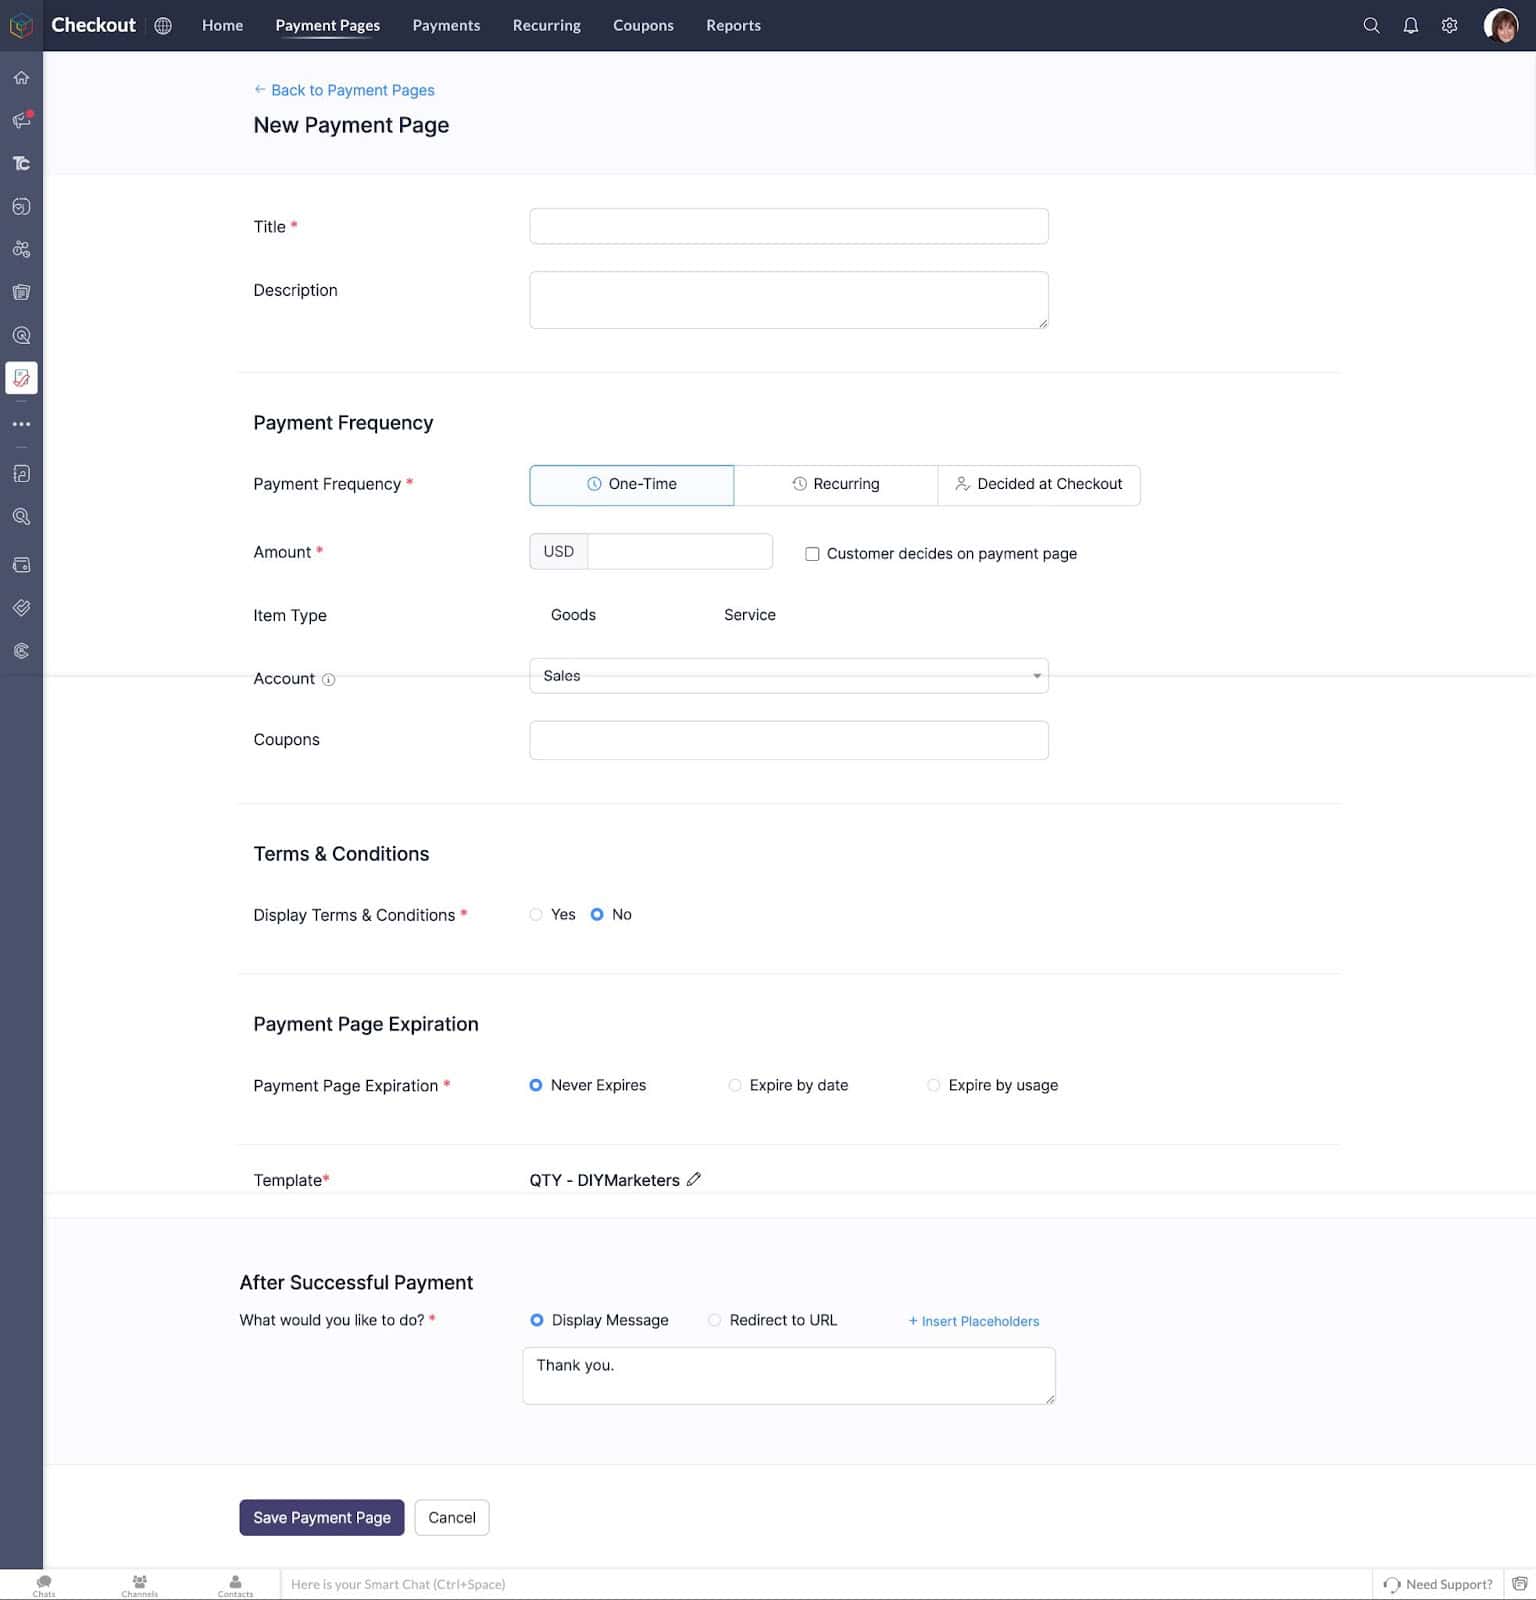
- Save and publish your link.
- Share the link in your emails, website, or social media.
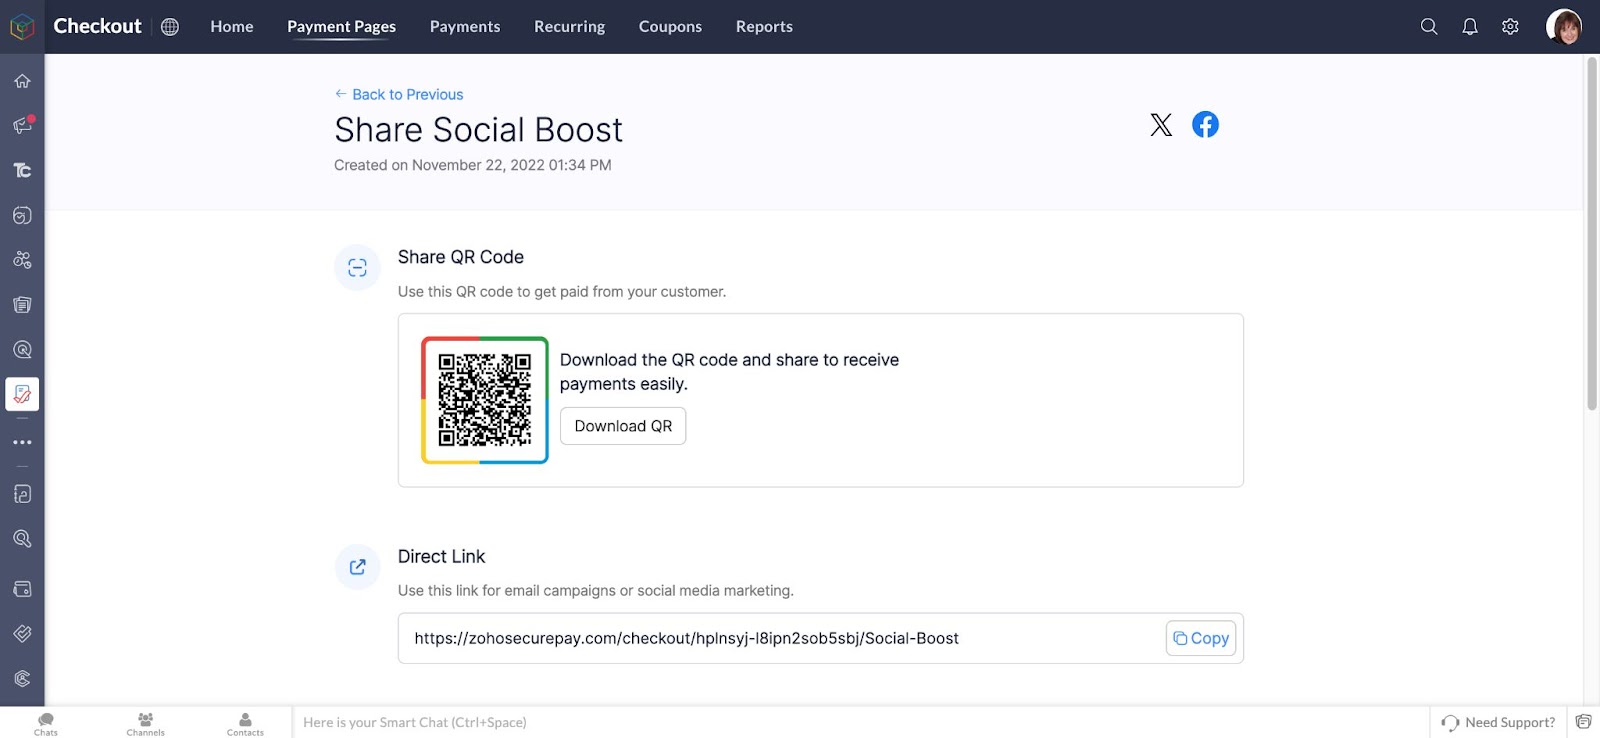
Here’s an example of a complete payment page:
Step 4: Automate Invoicing and Track Payments with Zoho Books
Now that your payment systems are in place and you’re ready to collect money, it’s time to organize it all. This step is where Zoho Books takes over to streamline your invoicing and make tracking income totally stress-free.
Here’s the thing about Zoho One—once you’ve added Zoho Invoice, you’re likely to be redirected to Zoho Books. Why? Because Zoho Books includes everything Zoho Invoice does… and then some. It’s your all-in-one accounting suite, and it’s where invoicing, payments, and reports all live together.
So instead of managing your invoices in one app and tracking payments in another, we’re going to keep it simple and do it all inside Zoho Books.
Why use Zoho Books?
Zoho Books isn’t just an invoicing tool—it’s a full-on business finance command center. Whether you’re sending your first invoice or prepping for tax season, it brings everything together in one easy-to-navigate place.
- Everything’s in one place – Track your clients, payments, invoices, and financial reports without switching between tools. It’s your money HQ.
- Works beautifully with the rest of Zoho – Zoho Books syncs automatically with Zoho Checkout, Zoho Payments, and Zoho CRM, so you’re never duplicating data or chasing down missing info.
- Powerful built-in tools – From tax summaries and profit/loss statements to budgeting and expense tracking, it helps you make smart decisions with clear, simple insights.
And remember—Zoho Books is included in Zoho One. That means no extra cost, no extra signups, and no reason not to start.
Step-by-Step: Set Up Invoicing and Payment Tracking in Zoho Books
- From your Zoho One dashboard, open Zoho Books.
- Click to Settings>Preferences> Organization and customize with your logo, business info, and payment terms.
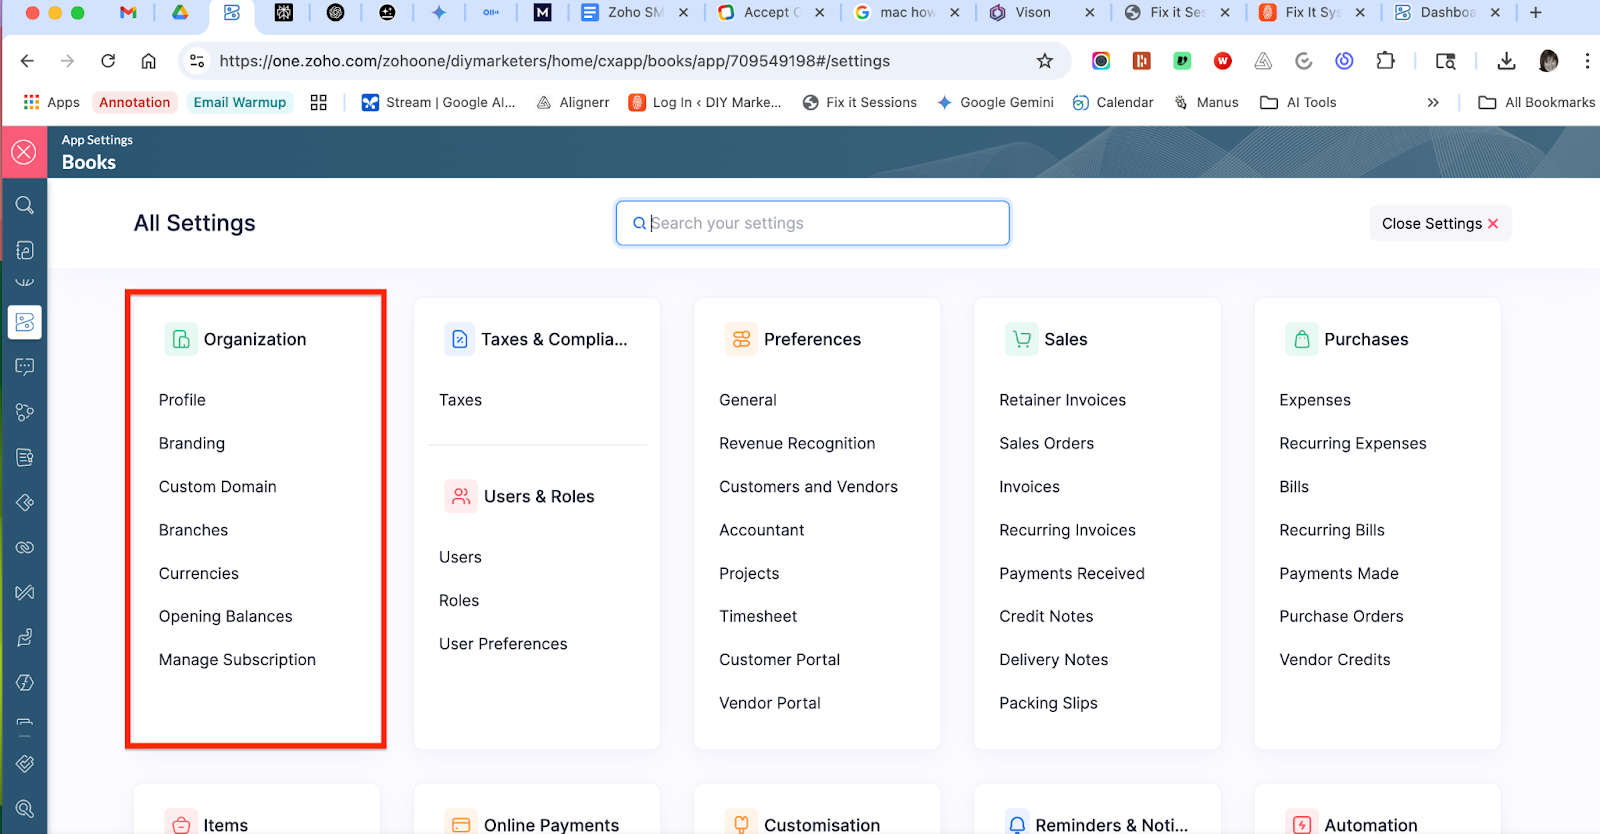
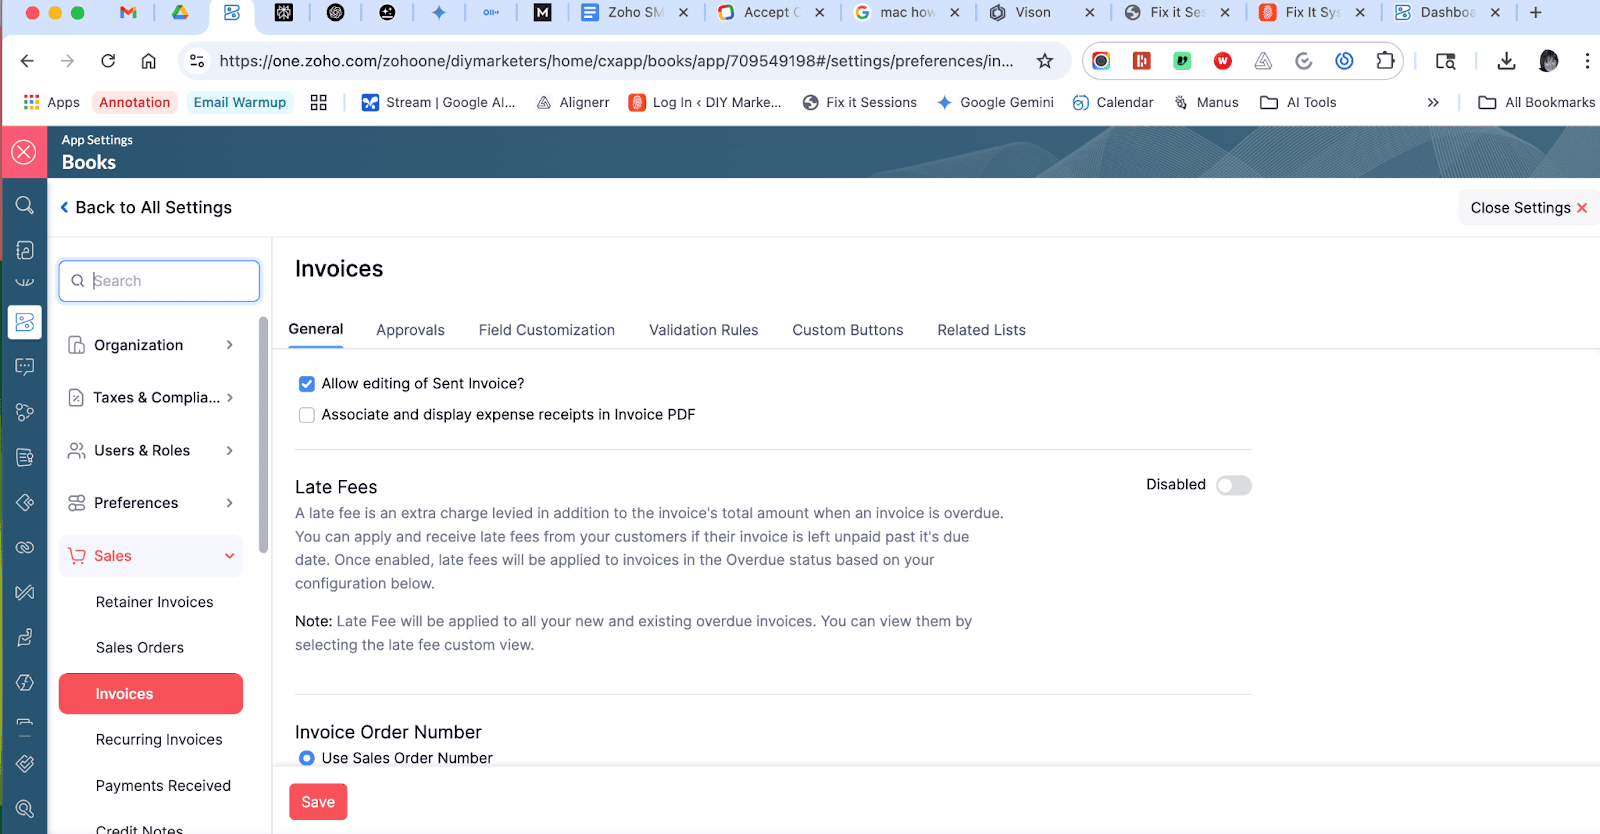
- Navigate to Settings > Preferences > Sales>Invoices to set up your default invoice template.
- Head over to Contacts and add your first client.
- Click + New Invoice, select your contact, and add your offer details.
- Set a due date and add any taxes or discounts.
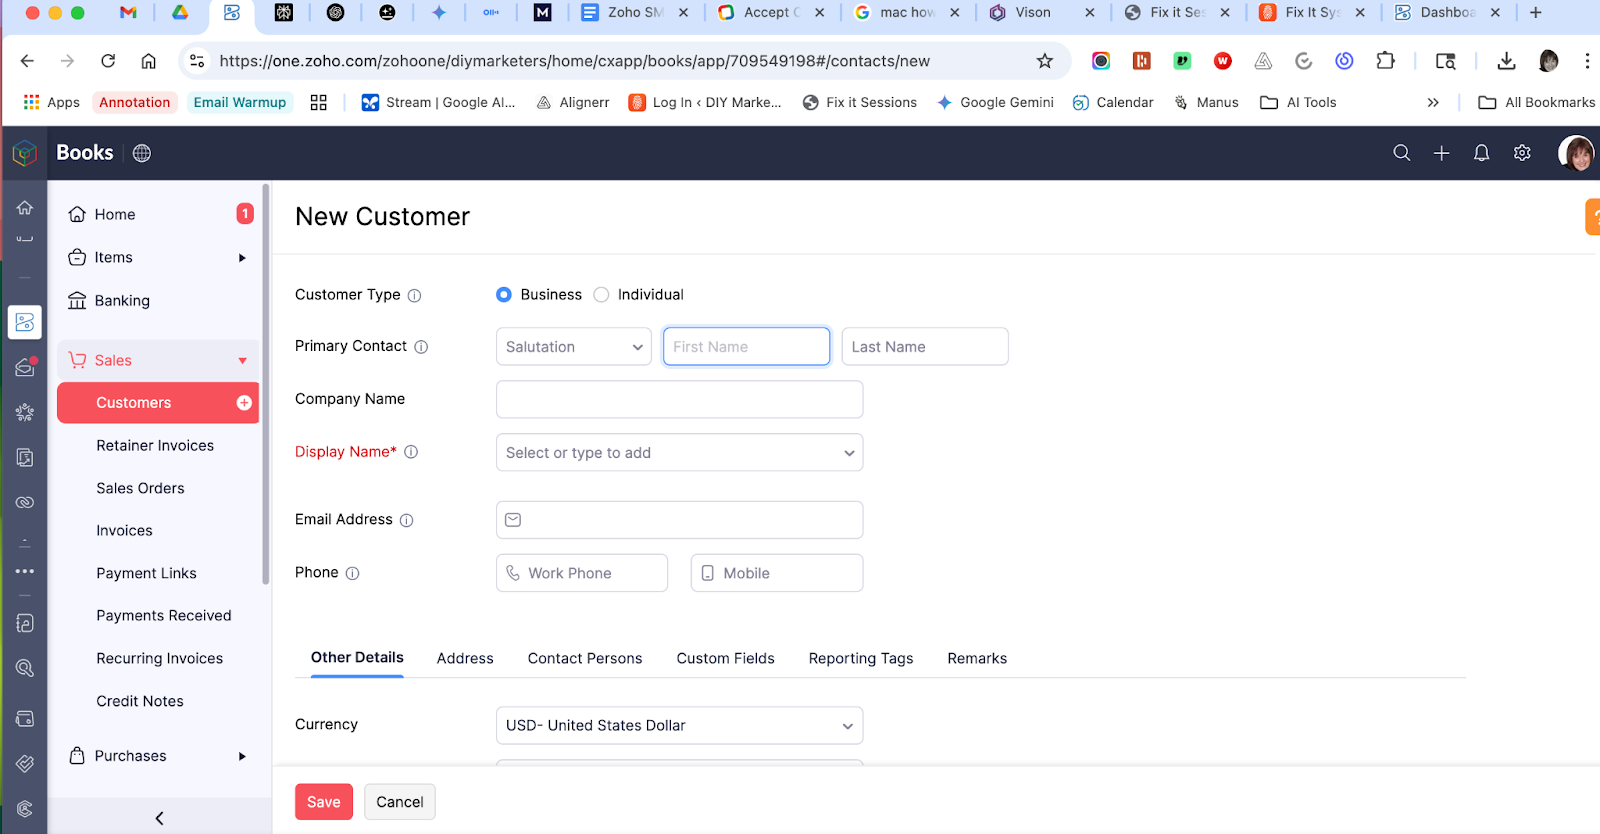
- Click Send to email the invoice directly—or copy the link to share it.
- Turn on Payment Reminders to automate your follow-ups.
- Check Payments > Customer Payments to track who paid and when.
- Use the Reports tab to generate summaries for taxes, income tracking, or budgeting.
👉 Try Zoho Books now
Bonus: Get Paid with Zoho Bookings
If you’re a consultant, coach, lawyer, or service provider—this one’s for you.
Zoho Bookings lets you get paid just by letting people book time on your calendar. No back-and-forth. No chasing payments. You set the availability, price, and payment method—Zoho handles the rest.
Here’s how to use it:
- Open Zoho Bookings from your Zoho One dashboard.
- Sync your Zoho Calendar or Google Calendar.
- Create a new service (e.g. “Strategy Session – $197”).
- Set your availability, duration, and buffer time.
- Connect your payment gateway (Stripe, Razorpay, or PayPal).
- Embed the booking link on your site or share it directly.
Your clients can book and pay in one smooth motion—no manual invoicing required.
Screenshots to include:
- Zoho Bookings calendar sync
- Service creation screen with pricing
- Booking link preview with payment option
You don’t need a website. You don’t need a funnel. You don’t even need an audience. You just need a payment link and an offer that solves a problem.
By setting up your Zoho Checkout and Zoho Invoice tools now, you’re making sure your business isn’t just busy—it’s bankable.
Next Week: We’ll build out your online presence with a landing page, a bio site, and link everything to your brand.
Need Help? Book a Fix-It Session
If setting this up sounds like a headache, let me walk you through it.
I offer Fix-It Sessions where we get your Zoho payment tools set up in real time. You’ll walk away with:
- A live checkout page
- Your first invoice template
- Everything tested and connected to your bank account
👉 Book Your Fix-It Session Now
Placeholder for video: How to Take Payments by Tonight Using Zoho Checkout and Invoice
FAQ: What New Business Owners Want to Know
1. Do I need a website to use Zoho Checkout? Nope! You get a hosted payment page with a shareable link you can post anywhere.
2. Can I connect PayPal or Stripe to Zoho? Yes, Zoho supports Stripe and Razorpay natively. For PayPal, you can use Zoho Invoice.
3. Is Zoho Invoice free? Zoho Invoice is 100% free and includes time tracking, estimates, recurring billing, and more.
4. What if I need recurring payments? Use Zoho Checkout’s recurring option or set up auto-invoicing in Zoho Invoice.5. Do I need Zoho Books too? If you want to track income and generate reports, yes—but Zoho Books Lite is included in Zoho One.
Low budget marketing strategies for CEOs with no marketing department. Join DIYMarketers.com for free marketing tips.
Source: https://diymarketers.com/how-to-get-paid-immediately-with-zoho/
Anyone can join.
Anyone can contribute.
Anyone can become informed about their world.
"United We Stand" Click Here To Create Your Personal Citizen Journalist Account Today, Be Sure To Invite Your Friends.
Before It’s News® is a community of individuals who report on what’s going on around them, from all around the world. Anyone can join. Anyone can contribute. Anyone can become informed about their world. "United We Stand" Click Here To Create Your Personal Citizen Journalist Account Today, Be Sure To Invite Your Friends.
LION'S MANE PRODUCT
Try Our Lion’s Mane WHOLE MIND Nootropic Blend 60 Capsules
Mushrooms are having a moment. One fabulous fungus in particular, lion’s mane, may help improve memory, depression and anxiety symptoms. They are also an excellent source of nutrients that show promise as a therapy for dementia, and other neurodegenerative diseases. If you’re living with anxiety or depression, you may be curious about all the therapy options out there — including the natural ones.Our Lion’s Mane WHOLE MIND Nootropic Blend has been formulated to utilize the potency of Lion’s mane but also include the benefits of four other Highly Beneficial Mushrooms. Synergistically, they work together to Build your health through improving cognitive function and immunity regardless of your age. Our Nootropic not only improves your Cognitive Function and Activates your Immune System, but it benefits growth of Essential Gut Flora, further enhancing your Vitality.
Our Formula includes: Lion’s Mane Mushrooms which Increase Brain Power through nerve growth, lessen anxiety, reduce depression, and improve concentration. Its an excellent adaptogen, promotes sleep and improves immunity. Shiitake Mushrooms which Fight cancer cells and infectious disease, boost the immune system, promotes brain function, and serves as a source of B vitamins. Maitake Mushrooms which regulate blood sugar levels of diabetics, reduce hypertension and boosts the immune system. Reishi Mushrooms which Fight inflammation, liver disease, fatigue, tumor growth and cancer. They Improve skin disorders and soothes digestive problems, stomach ulcers and leaky gut syndrome. Chaga Mushrooms which have anti-aging effects, boost immune function, improve stamina and athletic performance, even act as a natural aphrodisiac, fighting diabetes and improving liver function. Try Our Lion’s Mane WHOLE MIND Nootropic Blend 60 Capsules Today. Be 100% Satisfied or Receive a Full Money Back Guarantee. Order Yours Today by Following This Link.


